Feeling all the aches and pains from too much time spent sitting down at a desk or behind the wheel? Your mobility might be a problem. Men’s Health Advisory Board Member Dan Giordano, a licensed physical therapist and C.S.C.S., created the new Daily Mobility program exclusively on All Out Studio, which can help to increase blood flow, circulation, and even temporarily improve your range of motion for your workouts.
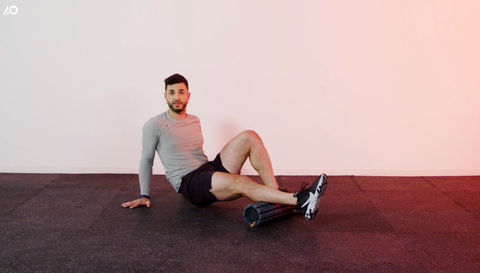
Whether you’re tight from hours of sitting during your 9 to 5 or sore from an ultra-aggressive leg workout full of heavy squats and deadlifts, you might find some relief using the foam roller. The is tool is universally regarded as a way to give your muscles some TLC. And when used correctly, foam rolling works.
That correctly part, however, doesn’t always happen. As much as foam rolling has become a gym rite of passage, plenty of people don’t know handle it correctly. Some roll too hard, others skip essential parts of the foam rolling process as they rush through—proper form isn’t widely understood. That lack of knowledge can prevent your muscles from getting the most from the process.
That’s part of why Dan Giordano, P.T., D.P.T., C.S.C.S., built a full-body, foam-rolling tutorial into his new Daily Mobility program on All Out Studio. He wants you to foam roll correctly, because that will put you in position to crush your workouts—and feel better in every moment of every day. “The foam roller allows you to down-regulate your nervous system and prep your body for recovery,” says Giordano, who also serves on the Men’s Health Advisory Board. “It increases blood flow so the body can heal itself properly and you can optimize your performance the next time you get out there.”
To get those benefits, though, you’ll want to follow these do’s and don’ts—and check out Giordano’s Daily Mobility program for even more recovery goodness, too.

DO: Use the Foam Roller for Both Warmup and Recovery
Giordano says the foam roller can and should be used both pre- and post-workout, albeit with a slightly different M.O. for each scenario. “If you’re foam-rolling prior to activity, do only 15 seconds per area to increase blood flow and release muscle tension, then do your warmup,” Giordano says. “Post-workout, roll for a minute on each area and go ahead and dig a little deeper.”
If you roll too long prior to a workout, the nervous system is down-regulated rather than prepared for activity, and there is a possibility force output could be decreased during your workout.
DON’T: Foam Roll to Pain
Foam rolling shouldn’t be painful. If it is, adjust your body weight and the depth of compression by shifting slightly off the area. Then, if you want more pressure, increase the bodyweight.
So, if you’re foam rolling your right glute with the right leg crossed over the left in a figure-four position and it’s just too intense, un-cross the top leg to relieve the tension by decreasing the pressure added by that extra bodyweight. “You shouldn’t be crushing yourself or really mashing tender areas, because it can cause bruising and inflammation” Giordano says. “Be gentle, and adjust your bodyweight to the correct amount of pressure.”
DO: Foam Roll Side to Side (and Up and Down)
“Because of how fascia can misalign, it’s important to roll side to side as well as up and down,” Giordano says. So, roll one inch at a time along the muscle belly, then stop, then go side to side on the same muscle.
If you find a really sticky spot, go side to side there as well, rolling on and off instead of just digging into the area to release tightness and tension. This is an easier way to have less pain while rolling while still massaging the area.
DON’T: Foam Roll on Your Bones
Keep the roller away from bones and joints. “If you press the foam roller into your bone, the only thing it can possibly do is cause a bone bruise,” Giordano says.
However, he points out that in some areas, like the hip flexor or hamstring, you want to get into the tendon area closer to the bone, because nerves run through that muscle-tendon junction and rolling into the tendon can provide some relief. “Go as far as you want on the muscle tissue or the tendon itself without touching the bone,” Giordano says. “The foam roller should never touch the bone.”
DO: Try the “Pin and Stretch” Foam Rolling Technique
The “Pin and Stretch” technique is a great way to release a very tight spot. “If you’re foam rolling your quad, and you feel a sticky spot, bring that quad muscle to a stretch position,” Giordano explains. “If you’re on your stomach, bring your heel toward your butt by flexing the knee, and hold the stretch while you move up and down and side to side on the roller.” By moving through range of motion, you can help get rid of painful trigger point areas.
DON’T: Use the Foam Roller on Your Lower Back
Giordano thinks the risk outweighs the reward when it comes to foam rolling the lumbar spine. “People foam roll their spines when they are having back pain, but by exerting that pressure and hyperextending, the muscles around the joints can go into spasm,” he explains.
This can exacerbate any lower back pain you are already experiencing. When foam-rolling the back, start at the mid-back, with the foam roller just under the shoulder blades, and work upwards.
GET THE PROGRAM
Want more stretches and routines from Giordano? You’ll need to check out the full Daily Mobility program, only available on All Out Studio.
Source: Read Full Article